The independent and paired T-test in jamovi

This is a short tutorial on comparing two means with the independent and paired t-test in jamovi.

Description of the data

I have downloaded the dataset from the Mathematics and Statistics Help (MASH) site. The dataset contains data on 78 persons following one of three diets. I will use the dataset to show you how to estimate the difference between two means with the independent t-test analysis and the dependent t-test analysis in jamovi. I will ignore the different diets and focus on gender differences and pre- and post-weight differences instead.

I will focus on two substantive research questions.

  1. To what extent does following a diet lead to weight loss?
  2. To what extent does the weight lost differ between females and males?

The paired t-test in jamovi

Let’s start with the first research question. Statistical analysis can be useful for answering the research question, but then we will first have to translate the substantive question into a statistical one. Now, it seems reasonable to assume that if following a diet leads to weight loss, that the typical weight before the diet differs from the typical weight after following the diet. If we assume furthermore that the mean provides a good representation of what is typical, then it is plausible that the mean weight before the diet differs from the mean weight after the diet.

If we are interested in the extent to which means differ, we are – statistically speaking – interested in the extent to which expected values differ. So, our analysis will focus on finding out what our data have to say about the difference between the expected values. More concrete: we focus on the difference between the expected values for weight (measured in kg) before and after the diet. Using conventional symbols, we aim at uncovering quantitative information about the difference \mu_{pre\ weight} – \mu_{post\ weight}.

Since all persons were measured pre and post diet, the measurements are likely to be correlated. Indeed, the sample correlation equals r = .96. We need to take this correlation into account and that is why we use the statistical techniques for estimation and testing that are available in the paired t-test analysis in jamovi.

Doing the paired t-test in jamovi

In a real research situation, we would of course start with descriptive analyses to figure out what the data seem to suggest about the extent to which a diet leads to weight loss. But now we are just looking at how to obtain the relevant inferential information from jamovi.

I have chosen the following options for the analysis.

Choosing Jamovi paired t-test options
Figure 1. Paired t-test analysis options in jamovi

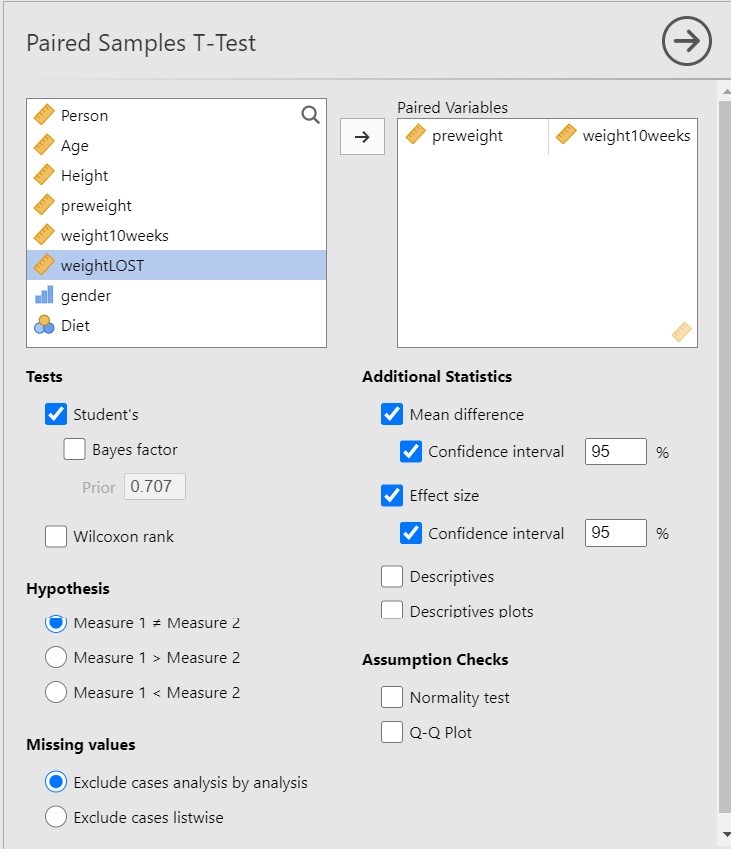
Since we are interested in the extent to which following a diet leads to weight loss, it is important to realize that the t-test in itself does not necessarily provide useful information. Why? Because the t-test gives us input to make the decision whether to reject the null-hypothesis that the expected values are equal, and only indirectly provides us with the information about the extent to which the expected values differ, and the latter is of course what we are interested in: we want quantitative information! The more useful information is provided by the estimate of the mean difference and the 95% Confidence Interval.

The paired t-test output

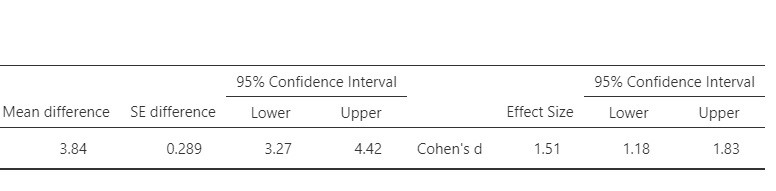
The relevant output for the t-test and the estimation results are presented in Figure 2.

Jamovi paired t-test output
Figure 2. Significance test and estimation results of the paired t-test analysis in jamovi

Let’s start with the t-test. The conventional null-hypothesis is that the expected values of the two variables are equal ( \mu_{pre\ weight} = \mu_{post\ weight}, or \mu_{pre\ weight} – \mu_{post\ weight} = 0. . The alternative hypothesis is that the expected values are not equal. Following convention, we use a significance level of \alpha = .05, so that our decision rule is to reject the null-hypothesis if the p-value is smaller than .05 and to not reject but also not accept the null-hypothesis if the p-value is .05 or larger.

The result of the t-test is t(77) = 13.3, p < .001. Since the p-value is smaller than .05 we reject the null-hypothesis and we decide that the expected values are not equal. In other words, we decide that the population means are not equal. As we said above, this does not answer our research question, so we’d better move on to the estimation results.

The estimated difference between the expected values equals 3.84 kg, 95% CI [3.27, 4.42]. So, we estimate that the difference in expected weights after 10 weeks of following the diet is somewhere between 3.72 and 4.42 kilograms.

Cohen’s d for the paired design

Jamovi also provides point and interval estimates for Cohen’s d. This version of Cohen’s d is derived by standardizing the mean difference using the standard deviation of the difference scores. Figure 3 presents the relevant output. The estimated value of Cohen’s delta equals 1.51, 95% CI [1.18, 1.83]. Using rules of thumb for the interpretation of Cohen’s d, these results suggest that there may be a very large difference in mean weights of the pre- and postdiet measurements.

Figure 3. Estimation results from the paired t-test analysis in jamovi

There is an alternative conceptualisation of the standardized mean difference. Instead of using the SD of the difference scores, we may use the average of the SDs of the two measurements. See https://small-s.science/2020/12/cohens-d-for-paired-designs/ for an explanation and R-code for the calculation of the CI.

The independent t-test in jamovi

To answer the second research question, we will have to reframe the substantive question into a statistical one. Just like we assumed above, we will consider the difference between the expected values (or population means) to be the statistical quantity of interest.

The conventional statistical null-hypothesis of the t-test is that the expected value of the variable does not differ between the groups or conditions. In other words, the null-hypothesis is that the two population means are equal. If the test result is significant, we will reject the null-hypothesis and decide that the population means are not equal. Note that this does not really answer the research question. Indeed, we are interested in the extent to which the expected values differ and not in whether we can decide that the difference is not zero. For that reason, estimation results are usually more informative than the results of a significance test.

Doing the independent t-test in jamovi.

I have chosen the following options for the independent t-test analysis in jamovi.

Options for the independent t-test in jamovi.
Figure 4. Options for the independen t-test in jamovi

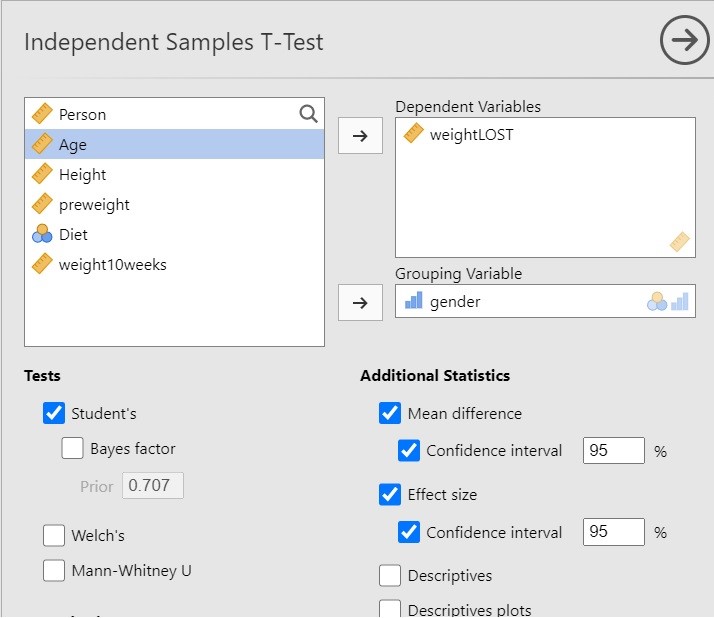
The above options will give you the results of the independent t-test and, more importantly, the estimation results, both unstandardized and standardized (Cohen’s d).

The independent t-test output

The relevant output is presented in Figure 5.

Output of the independent t-test analysis in jamovi. Including significance test and estimation results.
Figure 5. Output of the independent t-test analysis in jamovi

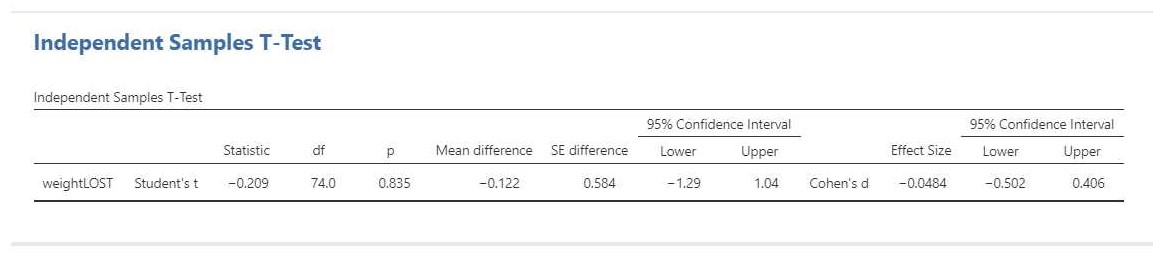
The result of the t-test is t(74) = -0.21, p = 0.84. This test result is clearly not significant, so we cannot decide that the population means differ. Importantly, we can also not decide that the population means are equal. That would be an instance of accepting the null-hypothesis and that is not allowed in NHST.

The estimation results (i.e. -0.12 kg, 95% CI [-1.29, 1.04]) make it clear that we should not necessarly believe that the population means are equal. Indeed, even though the estimated difference is only 0.12 kilograms, the CI shows the data to be consistent with differences up to 1 kg in either direction, i.e. with women showing more average weight loss than men or women showing less average weight loss than men.

Cohen’s d for the independent design

We can also find the standardized mean difference and its CI in the independent t-test output: Cohen’s d = -0.08, 95% CI [-0.50, 0.41]. In this case, Cohen’s d is based on the pooled standard deviaton. According to rules-of-thumb that are used frequently in psychology the estimated effect is negligible to small, but the CI shows the data to be consistent with medium effect sizes in either direction.

Chi-square test with summary data in jamovi

Suppose you want to do a chi-square test for independence in jamovi, but you only have summary data.  Fortunately it is super easy to do that in jamovi. Here is how.

This example is based on a question from an assignment I use in my Applied Statistics course (the assignment itself is from the instructor resources of the book Introduction to the New Statistics (first edition)).

The introductory text to the question is as follows.

To what extent might feeling powerful make you less considerate of the perspective of others?  In one study (Galinsky et al., 2006), participants were manipulated to feel either powerful (High  Power) or powerless (Low Power). They were then asked to write an ‘E’ on their forehead with a washable marker. Those who wrote the ‘E’ to be correctly readable from their own perspective—looking from inside the head—were considered ego-centric (Ego); those who
wrote it to be readable to others were considered to be non-ego-centric (Non-Ego).

Table 1 contains the data of the original study.

Ego Non-Ego Total
High Power 8 16 24
Low Power 4 29 33
Total 12 45 57
Table 1. Contingency table with the original data

Creating the dataset using summary data in jamovi

All you need to do is to a create a dataset with three variables. The first two variables are nominal variables. These variable define the rows and columns of your contingency table. Here, I opted for the variables Power, with levels 1 = High Power and 2 = Low Power and Perspective, with levels 1 = Ego and 2 = Non-Ego.

The third variable is the variable Counts (which can be nominal, ordinal and continuous, a far as I can tell). The count variable contains the number of observations for each combination of the two categorical variables.

This is what the dataset looks like:

Jamovi dataset with summary data for a chi-square test.
Figure 1. Jamovi dataset containing summary data for the chi-square test.

Doing the chi-square test

If you have the dataset, the rest is super easy as well. Just choose Frequencies on the Analyses tab followed by Independent samples. Now place your row, columns and counts variables in the right spot, as in Figure 2. That’s all!

Details of the chi-square test in jamovi.
Figure 2. input and output of the chi-square test using summary data in jamovi.

Comparing the quantiles of two groups

Comparing the quantiles of two groups provides information that is lost by simply looking at means or medians. This post shows how to do that.

Traditionally,  the comparison of two groups focuses on comparing means or medians.  But, as Wilcox (2012) explains, there are many more features of the distributions of two groups that we may compare in order to shed light on how the groups differ. An interesting approach is to estimate the difference between the quantiles of the two groups.  Wilcox (2012, pp. 138-150) shows us an approach that is based on the shift function. The procedure boils down to estimating the quantiles of both groups, and plotting the quantiles of the first group against the difference between the quantiles.

In order to aid in comparing the quantiles of the groups, I’ve created a function for R that can be used for plotting the comparison between the two groups. The functions uses the ggplot2 package and the WRS package (that can be found here: WRS: A package of R.R. Wilcox’ robust statistics functions version 0.24 from R-Forge (rdrr.io)) ; see also: Installation of WRS package (Wilcox’ Robust Statistics) | R-bloggers (r-bloggers.com).).

library(WRS)
library(ggplot2)

plotSband <- function(x, y, x.name = "Control") {
  x <- sort(x[!is.na(x)])
  y <- sort(y[!is.na(y)]) 
  qhat <- 1:length(x)/length(x)
  idx.y <- floor(qhat*length(y) + .5)
  idx.y[idx.y <= 0] <- 1
  idx.y[idx.y > length(y)] <- length(y)
  
  delta <- y[idx.y] - x
  
  cis <- WRS::sband(x, y, plotit=F)$m[, c(2, 3)]
  
  check.missing <- apply(cis, 2, function(x) sum(is.na(x)))
  if (sum(check.missing == length(x)) > 1) {
    stop("All CI limits equal to - or + Infinity")
  }
  ylims <- c(min(cis[!is.na(cis[,1]), 1]) - .50, 
             max(cis[!is.na(cis[,2]), 2]) + .50)
  
  cis[is.na(cis[, 1]), 1] <- ylims[1]*5
  cis[is.na(cis[, 2]), 2] <- ylims[2]*5
  
  thePlot <- ggplot(mapping = aes(x)) + 
    xlab(x.name) + 
    geom_smooth(aes(x = x, y = delta), se = F, col="blue") + 
    ylab("Delta") +
    geom_point(aes(x = quantile(x, c(.25, .50, .75)), 
                   y = rep(ylims[1], 3)), pch=c(3, 2, 3), size=2) +
    geom_ribbon(aes(ymin = cis[,1], ymax = cis[,2]), alpha=.20) + 
    coord_cartesian(ylim = ylims)
  suppressMessages(print(thePlot))
}

Let’s look at an example. Figure 1 presents data from an experiment investigating the persuasive effect of narratives on intentions of adopting a healthy lifestyle (see for details Boeijinga, Hoeken, and Sanders (2017)). The plotted data are the differences in intention between the quantiles of a group of participants who read a narrative focusing on risk-perception (detailing the risks of unhealthy behavior) and a group of participants who read a narrative focusing on action-planning (here called the control group), focusing on how the healthy behavior may actually be implemented by the participant.

Comparing the quantiles of two groups
Figure 1. Output from the plotSband-function

Figure 1 shows the following. The triangle is the median of the data in the control group, and the plusses the .25th and .75th quantiles. The shaded regions define the simultaneous 95% confidence intervals for the differences between the quantiles of the two groups. Here, these regions appear quite ragged, because of the discrete nature of the data. For values below 2.5 and above 3.5, the limits (respectively the lower and upper limits of the 95% CI’S) equal infinity, so these values extend beyond the limits of the y-axis. (The sband function returns NA for these limits). The smoothed-regression line should help interpret the general trend.

How can we interpret Figure 1? First of all, if you think that it is important to look at statistical significance, note that none of the 95% intervals exclude zero, so none of the differences reach the traditional significance at the .05 level. As we can see, none of them exclude differences as large as -0.50 as well, so we should not be tempted to conclude that because zero is in the interval that we should adopt zero as the point-estimate. For instance, if we look at x = 2.5, we see that the 95% CI equlas [-1.5, 0.0], the value zero is included interval, but so is the value -1.5. It would be unlogical to conclude that zero is our best estimate if so many values are included in the interval.

The loess-regression line suggests that the differences in quantiles between the two groups of the narrative is relatively steady for the lower quantiles of the distribution (up to the x = 3.0, or so; or at least below the median), but for quantiles larger than the median the effect gets smaller and smaller until the regression line crosses zero at the value x = 3.75. This value is approximately the .88 quantile of the distribution of the scores in the control condition (this is not shown in the graph).

The values on the y-axis are the differences between the quantiles. A negative delta means that the quantile of the control condition has a larger value than the corresponding quantile in the experimental condition. The results therefore suggest that participants in the control condition with a relatively low intention score, would have scored even lower in the other condition. To give some perspective: expressed in the number of standard deviations of the intention scores in the control group a delta of -0.50 corresponds to a 0.8 SD difference.

Note however, that due to the limited number of observations in the experiment, the uncertainty about the direction of the effect is very large, especially in the tails of the distribution (roughly below the .25 and above the .75 quantile). So, even though the data suggest that Action Planning leads to more positive intentions, especially for the lower quantiles, but still considerably for the .75 quantile, a (much) larger dataset is needed to obtain more convincing evidence for this pattern.

A confidence interval for the correlation coefficient

A confidence interval for the  population correlation coefficient \rho can be obtained with the Fisher-r-to-z transformation.   The steps are as follows.

  1. Transform r to a standard normal deviate Z
    Z_{xy} = \frac{1}{2}ln\left(\frac{1 + r}{1  –  r}\right), \tag{1}
    which is equal to:
    Z_{xy} = arctanh(r). \tag{2}
  2. Determine the standard error for Z:
    s_Z = \sqrt\frac{1}{N  –  3}. \tag{3}
  3. Calculate the Margin of Error (MoE) for Z:
    MOE_Z = 1.96*s_z. \tag{4}
  4. Add to and substract MoE  from Z to obtain a 95% Confidence Interval for Z.
  5. Transform the upper and lower limits of the CI for Z to obtain the corresponding limits for \rho, using:
    r_Z = \frac{e^{2Z} –  1}{e^{2Z} + 1}, \tag{4}
    which is equal to:
    r_Z = tanh(Z). \tag{5}

The following R-code does all the work:

conf.int.rho <- function(r, N) {
lims.rho =  tanh(atanh(r) + c(qnorm(.025), 
			qnorm(.975)) * sqrt(1/(N - 3)))
return(lims.rho)
}

So, if you have r = .50 and N = .50, just run the above function in R to obtain a confidence interval for the correlation coefficient. 

conf.int.rho(.50, 50)

## [1] 0.2574879 0.6832563


Cohen’s d for paired designs

For the paired design, which is traditionally used to obtain data for the paired t-test, we can calculate a standardized mean difference, Cohen’s d, using the average of the standard deviations of the two conditions. Cohen’s d for paired designs can be calculated as follows.

d_{av} =\frac{(M_1 - M_2)}{s_{av}}, \tag{1}

where s_{av} equals

s_{av}= \sqrt{\frac{1}{2}(S^2_1+S^2_2)}. \tag{2}

Now, (1) is of course an estimate of (3), the population value of Cohen’s d for paired designs, but we do not only need a point estimate, but also a confidence interval.

The following R-code can be used to obtain a 95% confidence interval for the estimate of \delta_{av}, the population mean difference standardized by using the average of the two standard deviations:

\delta_{av} = \frac{\mu_1 - \mu_2}{\sqrt{\frac{1}{2}(\sigma_1^2 + \sigma_2^2)}} , \tag{3}

This procedure uses the approximate procedure by Algina & Keselman (2003), which is also used by ESCI (Cumming, 2012; Cumming and Calin-Jageman, 2017), as Kline (2013) explains. The following steps are performed to obtain the 95% confidence interval.

  1. Use the obtained t-value of the paired t-test to estimate the non-centrality parameter \lambda. Steps 2 and 3 are for calculating a 95% confidence interval for the non-centrality parameter.
  2. Use an iterative procedure to find the non-centrality parameter of the t-distribution for which the observed t-value is the .025 quantile. This is the upper limit of the confidence interval for the non-centrality parameter.
  3. Use an iterative procedure to find the non-centrality parameter of the t-distribution for which the observed t-value is the .975 quantile. This is the lower limit of the confidence interval for the non-centrality parameter.
  4. To obtain a CI for \delta_{av} multiply the limits of the confidence interval for the non-centrality parameter by the value \sqrt{\frac{2S_D^2}{n(S_1^2+S_2^2)}} where n is the sample size, S_D^2 the variance of the difference scores , and S_1^2 and S_2^2 the variances of the two variables.

The following R-function does all the work. Note that with large potential values for the noncentrality parameter R issues warnings that “full precision has not been achieved in ‘pnt{final}'”. These warnings can be ignored ( I checked many examples against ESCI’s output), but in order to prevent them, I let the optimize function search from the observed value of t to maximally five times its value, and I have included the option to suppress warnings or not (just set warn = TRUE to get the warnings).

ci.d.av <- function(t, n, s.1, s.2, s.diff, warn = FALSE) {
  if (t < 1) {
    lims <- c(-5, 5)
  } else {
    lims <- c(-5*abs(t), 5*abs(t))
  }
  df = n - 1
  multiplier = sqrt((2*s.diff^2) / (n*(s.1^2 +  s.2^2)) )
  loss <- function(x, prob) (pt(t, df, x) - prob)^2  
  if (warn == FALSE) {
    ul <- suppressWarnings(optimize(loss, lims, prob=.025))$minimum 
    ll <- suppressWarnings(optimize(loss, lims, prob=.975))$minimum
  } else {
    ul <- optimize(loss, lims, prob=.025)$minimum 
    ll <- optimize(loss, lims, prob=.975)$minimum
  } 
    return(round(c(ll, ul), 4)*multiplier)  
}

The arguments of the function are t, the t-value of the t-test testing the hypothesis of equal population means, the sample size (n), the standard deviations (s.1 and s.2) of the two variables and the standard deviation of the difference scores (s.diff).

Calculating Cohen’s d for paired designs: an example

Here is a quick example.

library(MASS)
set.seed(1234)

# generate random multivariate normal data with sample size n = 20

theData <- mvrnorm(20, c(.5, .0), matrix(c(1, .8, .8, 1), 2, 2))

# calculate the standard deviations 

sds <- apply(theData, 2, sd)

# calculate the standard deviation of difference scores 

sDiff <- sd(theData[,1] - theData[,2])

# get t.value and a value for d.av 
# here I use the output of the t-test in R to obtain t and the mean
# difference score (needed for calculating d.av)

theTest <- t.test(theData[,1], theData[,2], paired=TRUE)
t = theTest$statistic
d.av = theTest$estimate / mean(sds)

ci.d.av(t = t, n = 20, s.1 = sds[1], s.2 = sds[2], sDiff)

The results are that the estimate equals d_{av} = 0.87, 95\% \text{CI} [0.51, 1.22].

Alternatively, we can make use of the conf.limits.nct function of the MBESS package (Kelley, 2007a, 2007b), and proceed as follows (using the data generated above).

library(MBESS)

ci.d.av.2 <- function(t, n, s.1, s.2, s.diff) {
  df = n - 1
  multiplier = sqrt((2*s.diff^2) / (n*(s.1^2 +  s.2^2)) )
  unlist(conf.limits.nct(t, df)[c(1,3)])*multiplier
}

ci.d.av.2(t = t, n = 20, s.1 = sds[1], s.2 = sds[2], s.diff = sDiff). 

References

Algina, J. & Keselman, H. J. (2003). Approximate confidence intervals for effect sizes. Educational and Psychological Measurement, 63, 721-734.

Cumming, G. (2012). Understanding the New Statistics. Effect Sizes, Confidence Interval, and Meta-Analysis. New York: Routledge.

Cumming, G. & Calin-Jageman, R. (2017). Introduction fo the New Statistics. Estimation, Open Science, and Beyond. New York: Routledge.

Kelley, K. (2007b). Confidence intervals for standardized effect sizes: Theory, application, and implementation. Journal of Statistical Software20(8), 1-24.

Kelley, K. (2007a). Methods for the Behavioral, Educational, and Social Sciences: An R Package. Behavior Research Methods39, 979–984.

Kline, R.b. (2013). Beyond Significance Testing. Statistics Reform in the Behavioral Sciences. (Second Edition). Washington: APA.

Linear Trend Analysis with R and SPSS

This is an introduction to contrast analysis for estimating the  linear trend among condition means with R and SPSS . The tutorial focuses on obtaining point and confidence intervals.  The contents of this introduction is based on Maxwell, Delaney, and Kelley (2017) and Rosenthal, Rosnow, and Rubin (2000). I have taken the (invented) data from Haans (2018). The estimation perspective to statistical analysis is aimed at obtaining point and interval estimates of effect sizes. Here, I will use the frequentist perspective of obtaining a point estimate and a 95% Confidence Interval of the relevant effect size. For linear trend analysis, the relevant effect size is the slope coefficient of the linear trend, so, the purpose of the analysis is to estimate the value of the slope and the 95% confidence interval of the estimate. We will use contrast analysis to obtain the relevant data.

[Note: A pdf-file that differs only slightly from this blogpost can be found on my Researchgate page: here; I suggest Haans (2018) for an easy to follow introduction to contrast analysis, which should really help understanding what is being said below].

The references cited above are clear about how to construct contrast coefficients (lambda coefficients) for linear trends (and non-linear trends for that matter) that can be used to perform a significance test for the null-hypothesis that the slope equals zero. Maxwell, Delaney, and Kelley (2017) describe how to obtain a confidence interval for the slope and make clear that to obtain interpretable results from the software we use, we should consider how the linear trend contrast values are scaled. That is, standard software (like SPSS) gives us a point estimate and a confidence interval for the contrast estimate, but depending on how the coefficients are scaled, these estimates are not necessarily interpretable in terms of the slope of the linear trend, as I will make clear
momentarily.

So our goal of the data-analysis is to obtain a point and interval estimate of the slope of the linear trend and the purpose of this contribution is to show how to obtain output that is interpretable as such.

Continue reading “Linear Trend Analysis with R and SPSS”

Planning for Precise Contrast Estimates: Introduction and Tutorial (Preprint)

I just finished a preprint of an introduction and tutorial to sample size planning for precision of contrast estimates. The tutorial focuses on single factor between and within subjects designs, and mixed factorial designs with one within and one between factor. The tutorial contains R-code for sample size planning in these designs.

The preprint is availabe on researchgate: Click (but I am just as happy to send it to you if you like; just let me know).

Contrast analysis with R: Tutorial for factorial mixed designs

In this tutorial I will show how contrast estimates can be obtained with R. Previous posts focused on the analyses in factorial between and within designs, now I will focus on a mixed design with one between participants factor and one within participants factor. I will discuss how to obtain an estimate of an interaction contrast using a dataset provided by Haans (2018).

I will illustrate two approaches, the first approach is to use transformed scores in combination with one-sample t-tests, and the other approach uses the univariate mixed model approach. As was explained in the previous tutorial, the first approach tests each contrast against it’s own error variance, whereas in the mixed model approach a common error variance is used (which requires statistical assumptions that will probably not apply in practice; the advantage of the mixed model approach, if its assumptions apply,  is that the Margin of Error of the contrast estimate is somewhat smaller).

Again, our example is taken from Haans (2018; see also this post. It considers the effect of students’ seating distance from the teacher and the educational performance of the students: the closer to the teacher the student is seated, the higher the performance. A “theory “explaining the effect is that the effect is mainly caused by the teacher having decreased levels of eye contact with the students sitting farther to the back in the lecture hall. To test that theory, a experiment was conducted with N = 9 participants in a factorial mixed design (also called a split-plot design), with two fixed factors: the between participants Sunglasses (with or without), and the within participants factor Location (row 1 through row 4). The dependent variable was the score on a 10-item questionnaire about the contents of the lecture. So, we have a 2 by 4  mixed factorial design, with n = 9 participants in each combination of the factor levels.

We will again focus on obtaining an interaction contrast: we will estimate the extent to which the difference between the mean retention score on the first row and those on the other rows differs between the conditions with and without sunglasses.

Continue reading “Contrast analysis with R: Tutorial for factorial mixed designs”

The Anatidae Principle

If it looks like a duck, and quacks like a duck, we have at least to consider the possibility that we have a small aquatic bird of the family Anatidae on our hands.
– Douglas Adams

I like to teach my students how they can apply to their data-analysis what I call the Anatidae Principle (or the Principle of the Duck). (The name is obviously inspired by the above quote from Douglas Adam’s Dirk Gently’s Holistic Detective Agency).

For the purpose of data-analysis, the Anatidae Principle simply boils down to the following: If it looks like you found a relation, difference, or effect in your sample you should at least consider the possibility that there indeed is a relation, difference or effect. That is, look at your data, summarize, make figures, and think (hard) about what your data potentially mean for the answer to your research question, hypotheses, hunches, whatever you like. Do this before you start calculating p-values, confidence intervals, Bayes Factors, Posterior distributions, etc., etc.

In my experience, researchers too often violate the Anatidae Principle: they calculate a p-value, and if it is not significant they simply ignore their sample results. Never mind that, as they predicted, group A  outperforms group B, if it is not significant, they will claim they found no effect. And, worse still, believe it.

Kline (2013) ) (p. 117) gives solid advice:

“Null hypothesis rejections do not imply substantive significance, so researchers need other frames of reference to explain to their audiences why the results are interesting or important. A start is to learn to describe your results without mention of statistical significance at all. In its place, refer to descriptive statistics and effect sizes and explain why those effect sizes matter in a particular context. Doing so may seem odd at first, but you should understand that statistical tests are not generally necessary to detect meaningful or noteworthy effects, which should be obvious to visual inspection of relatively simple kinds of graphical displays (Cohen, 1994). The description of results at a level closer to the data may also help researchers to develop better communication skills.”

Planning with assurance, with assurance

Planning for precision requires that we choose a target Margin of Error (MoE; see this post for an introduction to the basic concepts) and a value for assurance, the probability that MoE will not exceed our target MoE.  What your exact target MoE will be depends on your research goals, of course.

Cumming and Calin-Jageman (2017, p. 277) propose a strategy for determining target MoE. You can use this strategy if your research goal is to provide strong evidence that the effect size is non-zero. The strategy is to divide the expected value of the difference by two, and to use that result as your target MoE.

Let’s restrict our attention to the comparison of two means. If the expected difference between the two means is Cohens’s d = .80, the proposed strategy is to set your target MoE at f = .40, which means that your target MoE is set at .40 standard deviations. If you plan for this value of target MoE with 80% assurance, the recommended sample size is n = 55 participants per group. These results are guaranteed to be true, if it is known for a fact that Cohen’s d is .80 and all statistical assumptions apply.

But it is generally not known for a fact that Cohen’s d has a particular value and so we need to answer a non-trivial question: what effect size can we reasonably expect? And, how can we have assurance that the MoE will not exceed half the unknown true effect size? One of the many options we have for answering this question is to conduct a pilot study, estimate the plausible values of the effect size and use these values for sample size planning.  I will describe a strategy that basically mirrors the sample size planning for power approach described by Anderson, Kelley, and Maxwell (2017).

The procedure is as follows. In order to plan with approximately 80% assurance, estimate on the basis of your pilot the 80% confidence interval for the population effect size and use half the value of the lower limit for sample size planning with 90% assurance. This will give you 81% assurance that assurance MoE is no larger than half the unknown true effect size.

The logic of planning with assurance, with assurance

There are two “problems” we need to consider when estimating the true effect size. The first problem is that there is at least 50% probability of obtaining an overestimate of the true effect size. If that happens, and we take the point estimate of the effect size as input for sample size planning, what we “believe” to be a sample size sufficient for 80% assurance will be a sample size that has less than 80% assurance at least 50% of the times. So, using the point estimate gives assurance MoE for the unknown effect size with less than 50% assurance.

To make it more concrete: suppose the true effect equals .80, and we use n = 25 participants in both groups of the pilot study, the probability is  approximately 50% that the point estimate is above .80. This implies, of course, that we will plan for a value of f > .40, approximately 50% of the times, and so the sample we get will only give us 80% assurance 50% of the times.

The second problem is that the small sample sizes we normally use for pilot studies may give highly imprecise estimates. For instance, with n = 25 participants per group, the expected MoE is f = 0.5687. So, even if we accept 50% assurance, it is highly likely that the point estimate is rather imprecise.

Since we are considering a pilot study,  one of the obvious solutions, increasing the sample size so that expected MoE is likely to be small, is not really an option. But what we can do is to use an estimate that is unlikely to be an overestimate of the true effect size. In particular, we can use as our estimate the lower limit of a confidence interval for the effect size.

Let me explain, by considering the 80% CI  of the effect size estimate. From basic theory it follows that the “true” value of the effect size will be smaller than the lower limit of the 80% confidence interval with probability  equal to 10%. That is, if we calculate a huge number of 80% confidence intervals, each time on the basis of new random samples from the population, the true value of the effect size will be below the lower limit in 10% of the cases. This also means that the lower limit of the interval has 90% probability to not overestimate the true effect size.

This means that  if we take the lower limit of the 80% CI of the pilot estimate as input for our sample size calculations, and if we plan with assurance of .90, we will have 90%*90% = 81% assurance that using the sample size we get from our calculations will have  MoE  no larger than half the true effect size. (Note that for 80% CI’s with negative limits you should choose the upper limit).

Sample Size planning based on a pilot study

Student of mine recently did a pilot study.  This was a pilot for an experiment investigating the size of the effect of fluency of delivery of a spoken message in a video on Comprehensibility, Persuasiveness and viewers’ Appreciation of the video. The pilot study used two groups of size n = 10, one group watched the fluent video (without ‘eh’) and the other group watched the disfluent video where the speaker used ‘eh’ a lot. The dependent variables were measured on 7-point scales.

Let’s look at the results for the Appreciation variable. The (biased) estimate of Cohen’s d (based on the pooled standard deviation) equals 1.09, 80% CI [0.46, 1.69] (I’ve calculated this using the ci.smd function from the MBESS-package. According to the rules-of-thumb for interpreting Cohen’s d, this can be considered a large effect. (For communication effect studies it can be considered an insanely large effect). However, the CI shows the large imprecision of the result, which is of course what we can expect with sample sizes of n = 10. (Average MoE equals f = 0.95, and according to my rules-of-thumb that is well below what I consider to be borderline precise).

If we use the lower limit of the interval (d = 0.46),  sample size planning with 90% assurance for half that effect (f = 0.23) gives us a sample size equal to n = 162. (Technical note: I planned  for the half-width of the standardized CI of the unstandardized effect size, not for the CI of the standardized effect size; I used my Shiny App for planning assuming an independent groups design with two groups).  As explained, since we used the lower limit of the 80% CI of the pilot and used 90% assurance in planning the sample size, the assurance that MoE will not exceed half the unknown true effect size equals 81%.